Beginner FL Course
Beginner FL Course
Not only do we teach with Ableton and Logic at LSA but we also teach with FL Studio, the most affordable music production program. FL Studio, or FL for short is a powerful music production program that will allow you to create your own original tracks and remixes. It's famous as the bedroom producers DAW of choice.
FL Studio works on both Windows and Apple computers and we recommend that if you're looking for a laptop for production make sure you get at least 16GB of RAM and a decent processor. This will ensure your computer is powerful enough to run FL and process audio without crashing.
And what's great is that your can try FL for FREE! Click here to get FL for free!
If you want to learn how to produce with FL studio you can learn one-to-one with LSA tutors Erin or Paul either at our studios in London or online over Zoom from anywhere in the world. If you're a beginner book our Beginner Music Production Course by clicking here. There are four two-hour production lessons in the course. Most of our students take one a week.
The Beginner FL Course will teach you all the fundamental theory and skills on FL studio. Enough knowledge for you to start making full length tracks and remixes! Once you've got a buzz for production be sure to book the Intermediate and Advanced FL courses so that you can learn how to finish your tracks to a professional standard.
Click here to book our Beginner Music Production Course with FL Studio.
To get you started with FL here are some beginner FL tips from FL tutor Paul.

Beginner FL Tips
Here are some useful tips for beginner producers using FL studio. For more help book our one-to-one courses either in our studio in London or online over Zoom. Contact us for more information.
- Familiarise with Channel Rack
- Playlist for building/structuring ideas into full song
- When to use pattern mode & song mode
- Grid snap options
- Split by channel (especially for pattern arranging into full song idea)
FL studio is an interesting DAW that has a unique workflow. It can be confusing at first, especially if you are coming from other DAW’s (like myself!) but if FL is your first DAW software, I can easily see newcomers getting accustomed to it. I have compiled some beginner tips below, these were invaluable to me, when I first started experimenting with FL studio!
Song/Pattern Mode
When you first open FL, to the top left part of the screen, you will see that you will be either working in either SONG or PATTERN mode as shown here.
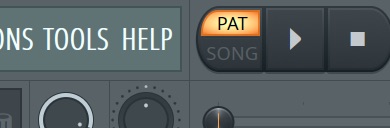
Simply put - Pattern mode is mainly used for rough & quick ideas, Song mode is for more for a whole song, whether that be 10 seconds, or 10 minutes!
For somebody who is new to music production software like FL, I would recommend spending time within the PATTERN mode, before moving onto the SONG mode. This would be because rough ideas can easily be done here, without the additional thought required for crafting a longer song!
Channel Rack
You will be spending a lot of time within this screen, as it very helpful for visually mapping out each beat in the step sequencer. Simple drum patterns can be easily built from this screen & you can experiment with placing the ‘steps’ in different parts, as the pattern plays (more on patterns later)
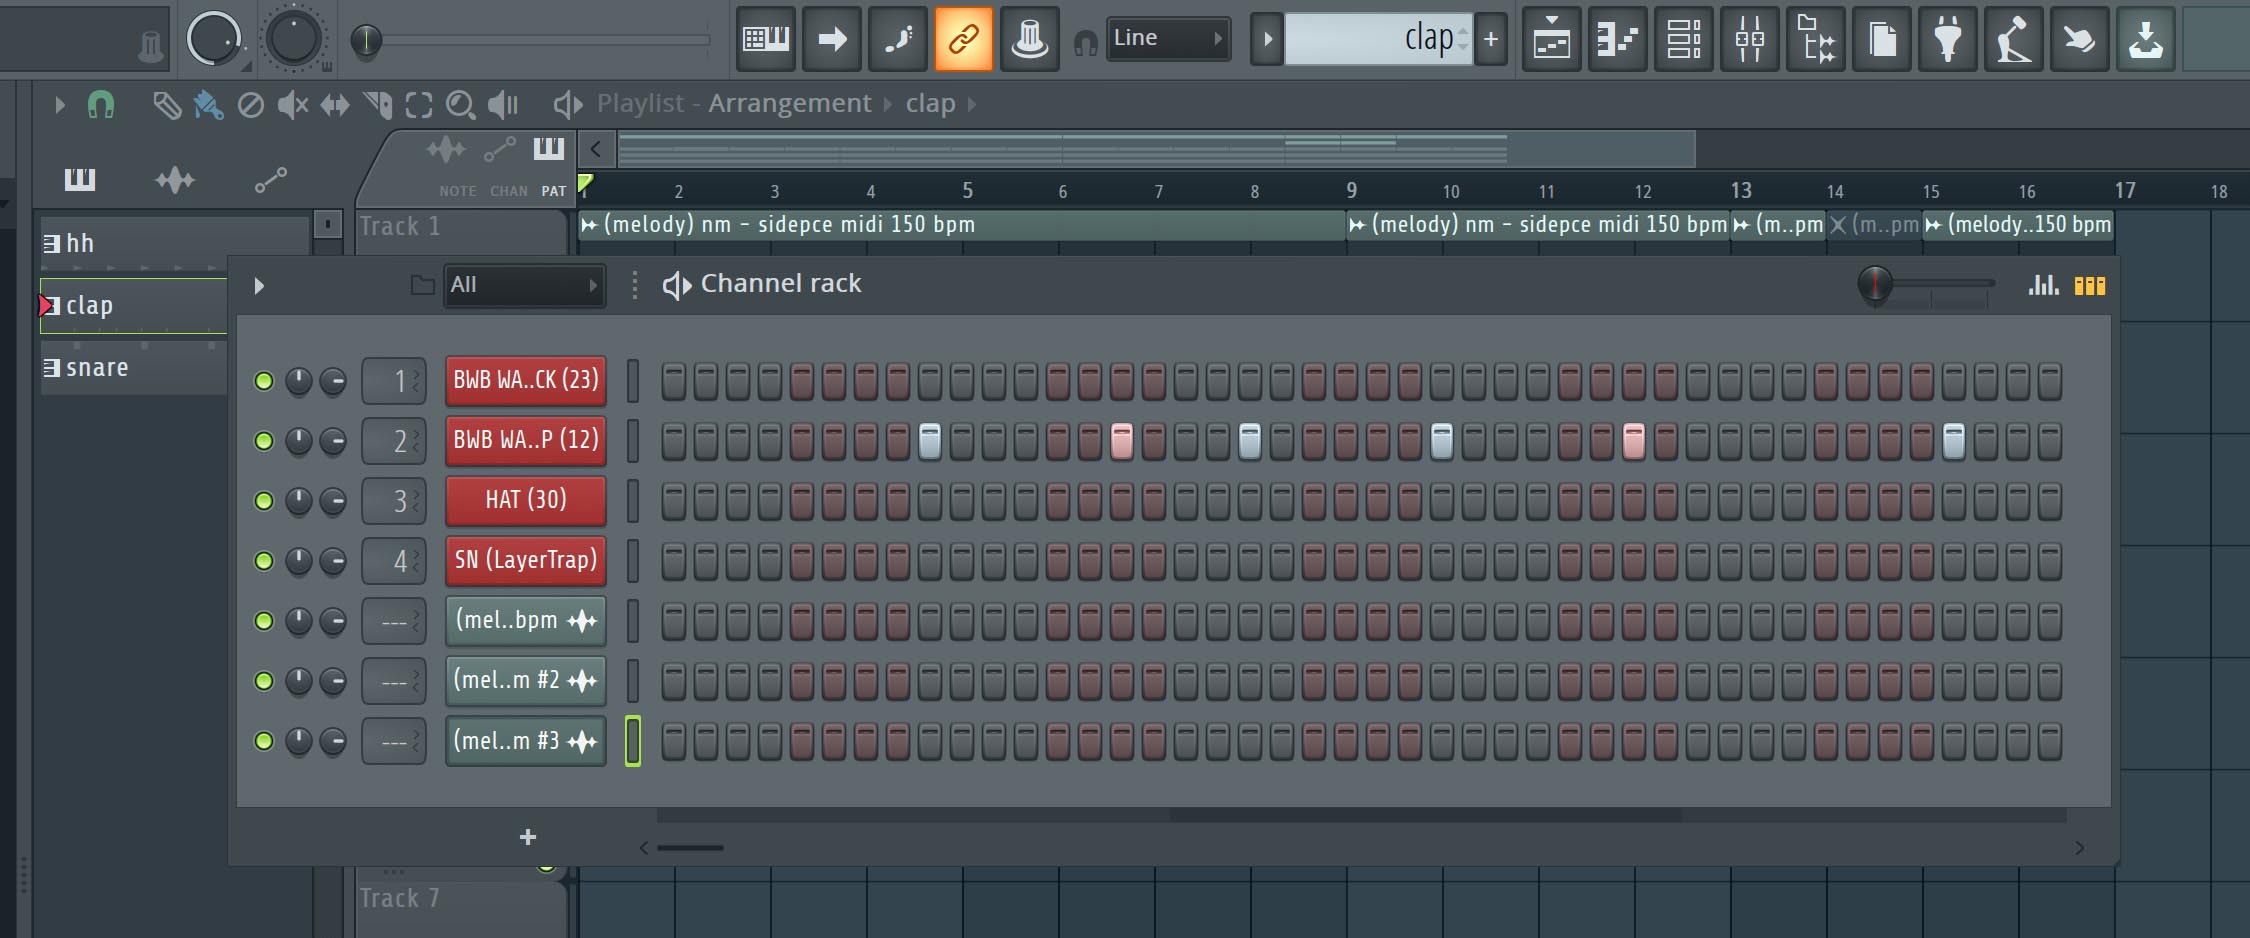
A few tips here..
You will see two controls to the left of every channel’s name. The pot on the left is the main volume control for that channel, is it very easy to miss, as it is very small! In first the few sessions with FL, I had been using the main mixer’s channel faders for volume control! (separate page)
On a channel with a pitched instrument/sample, the ‘default’ view of the ‘steps’ is not very helpful (for building a melody for example) you can press ‘option+right click’ & select ‘piano roll’, where it will take you to a new screen for easier melody building (More on this screen later)
After spending some time with the channel rack screen (in Pattern Mode) the Song mode screen would be the next step to expanding the rough ideas!
Here, you can chain patterns together to create songs.
For example - let’s say in pattern ‘A’ - you have have some simple drums (kick, clap, hi hats) & chords & melody
Pattern ‘B’ - maybe you would like some bass coming in, while a snare also comes in to reinforce the clap (while still keeping the foundation of pattern A)
We can join these patterns together & also create additional patterns, to form different parts of a song
Tip - ‘Make Unique’
When making changes to a selected pattern, unless we select this option (with command+right click, on the pattern selector to the left of the main playlist screen) the previous & new pattern will be identical, which can be a bit frustrating at first!
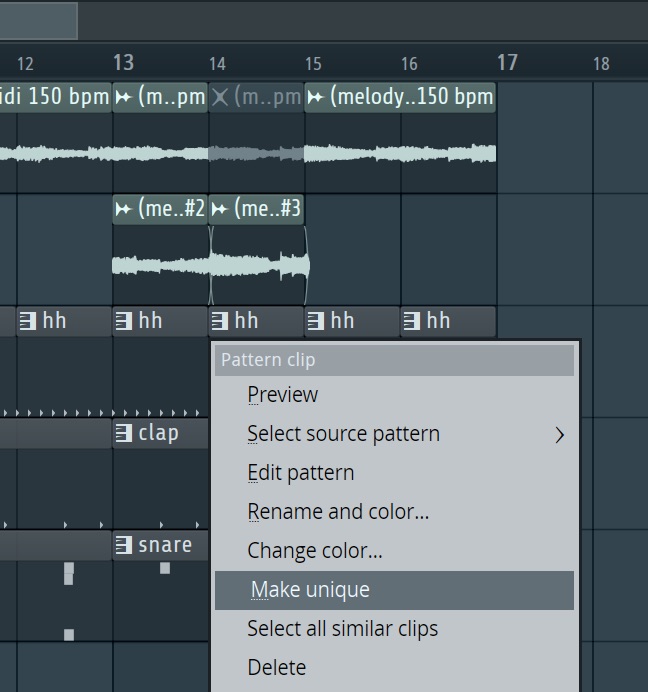
After selecting this option, you will notice that you will be able to add new elements, without affecting the previous pattern - which does help with adding variation to your compositions!
Split By Channel
Quick tip here, very helpful for expanding pattern ideas into individual instrument tracks, for even more variation of individual elements ( going from standard 8 beat Hi Hat pattern to a mixture of 16ths, 8ths & some 4ths, all in one clip)

Grid Snap Options
As you are building up your song from a 8 - bar loop, into different sections, you may notice that some clips in the playlist window can overlap, or not ‘snap’ in place properly -
To the left the BPM counter, there is a magnet-looking icon, with a drop-down menu - these are the grid snap options.

Generally speaking, unless you are doing intricate patterns within the piano roll or playlist window, i would recommend to stay at ‘beat’ or ‘line’ options, as these do not have much flexibility - therefore causing less ‘overlapping’ issues with individual clips. When you start to feel more familiar with the software, you can experiment with the other settings within this drop-down menu. The most flexible would be the ‘none’ setting, where you can literally place the clip (or midi note, if working in the piano roll screen) anywhere, which can be either very handy or very frustrating!
Also, keep in mind - the piano scroll & main playlist window grid snap setting can be set to different options! Remember the settings you have selected, as it can be easy to forget!
These are just a few tips to keep in mind! There are many many more to be shared, these would be my go-to! If you find this all a bit daunting, don't worry. Everyone does at first, which is why one-to-one tuition like that we offer at LSA will make your FL producer dreams a reality. Contact us if you'd like to book lessons with me.