Make Free Animated GIFs

What is a GIF?
GIF, which stands for graphic interchange format, is a file which supports a series of animated images that last for just a few seconds and can loop continuously. They can be snippets of video or animated visuals you have made yourself. Animated GIFs are seen all over the Internet and are mostly used for fun and entertainment purposes but they can also be an extremely powerful tool for online marketing and highly effective for generating more visitor engagement when used in a blog post, in a similar way as video. If you don’t have a relevant video to accompany written content i your post it is essential you include an animated GIF instead. Sometimes an animated GIF is better choice than a video. GIFs can be much more cost effective than videos when creating impressive looking visual content. Plus, a webpage’s loading speed isn’t affected by GIFs as they can be with videos.
How to make an animated GIF
LSA has created this super easy step-by-step visual tutorial to help you create professional animated GIFs using a collection of free apps on your iPhone or iPad so you can add some highly creative eye catching animated visuals to each of your blog posts helping them stand out and do better in a Google ranking. If you are a blogger with an artistic niche such as an illustrator, musician, designer, DJ or any type of creative talent it is vital you express your creativity in every one of your posts. So adding animated videos and GIFs in your content is the easiest most obvious way to do this.
So what do you need to start creating animated content in your posts?
Start off by downloading the following apps onto your iPad or iPhone using the app store:

KEYNOTE will be used to create your animation
DROPBOX will store your work and allow you to transfer your work between different apps and websites.
SAFARI will allow you to use Zamzar.com to convert your keynote animation into a .mov
iMOVIE will allow you to edit your movie before turning it into a GIF
INFLTR is useful for when you need to crop or change the frame ratio of your video (optional)
GIFSAPP allows you to convert .mov to .gif for free
GIF VIEWER allows you to view your GIF in action
Tip: Creating animated GIFs on apps you can download and use for free isn’t as straightforward as it first appears. There are countless different apps all promising to do the same as the ones I have selected here but they can be very misleading because many of them turn out to have hidden charges to unlock all the apps functions. LSA has tested all the GIF making apps available and has put together a collection of free apps that work together to help you make animated GIFs in the fastest most straightforward way with just an iPhone or iPad.
We will show you how to use these apps to make an animated GIF but before you can create an animated GIF your animation needs to be built in a presentation app before being converted into a video. The final video animation can then be converted into a GIF. This means that the information in this visual tutorial will show you just how easy it is to create free animations. This tutorial will show you how to create free animated videos. You can also use it to create free animated logos and you can use it to create free animated text. Whatever animated content you chose to make and add in your blog posts will help encourage far more visitor engagement.
Open Safari and save Zamzar.com in your bookmarks. Make sure your iPhone is using Safari as its default browser for downloading files.
Open Keynote to start working on your presentation/animation
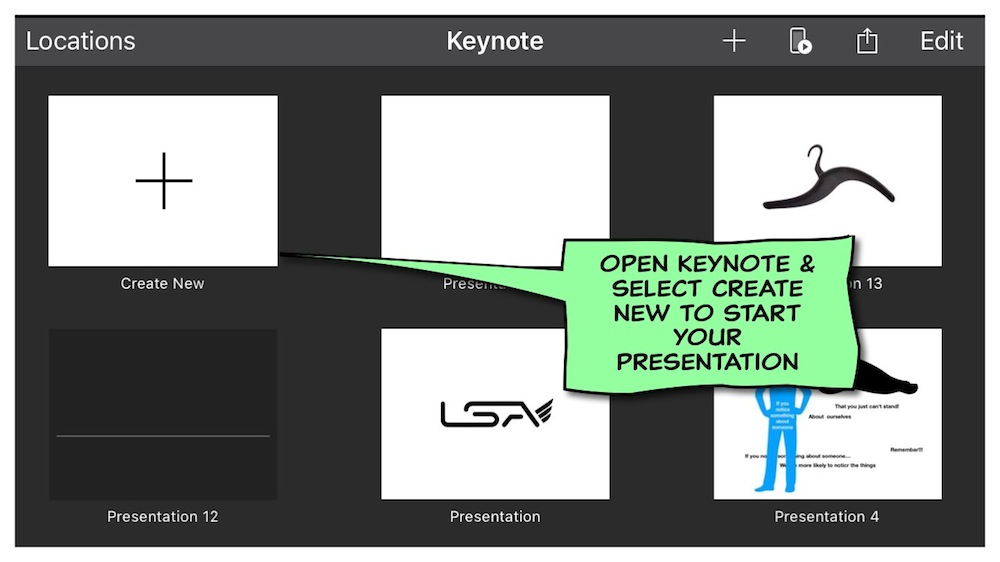
When you open a new presentation you can use the default text provided or delete it to start with a clear slide. We advised that you use only one slide to create your GIF because adding slides will make the GIF to large.
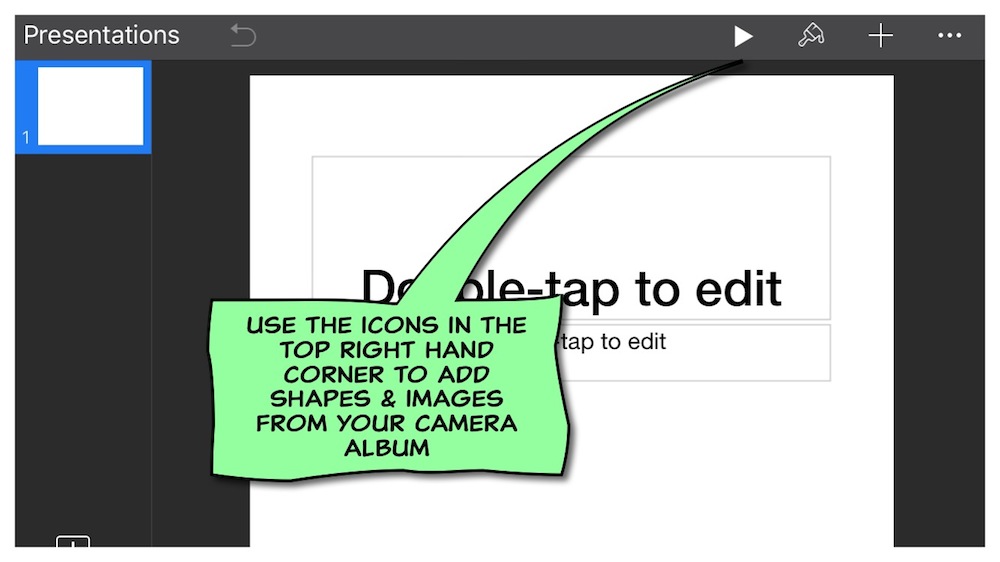

Select the cross icon to import images from your albums. You can also find a library of different, charts, shapes etc as well. Explore the options and experiment with them. I have prepared a few images to use in my animation.

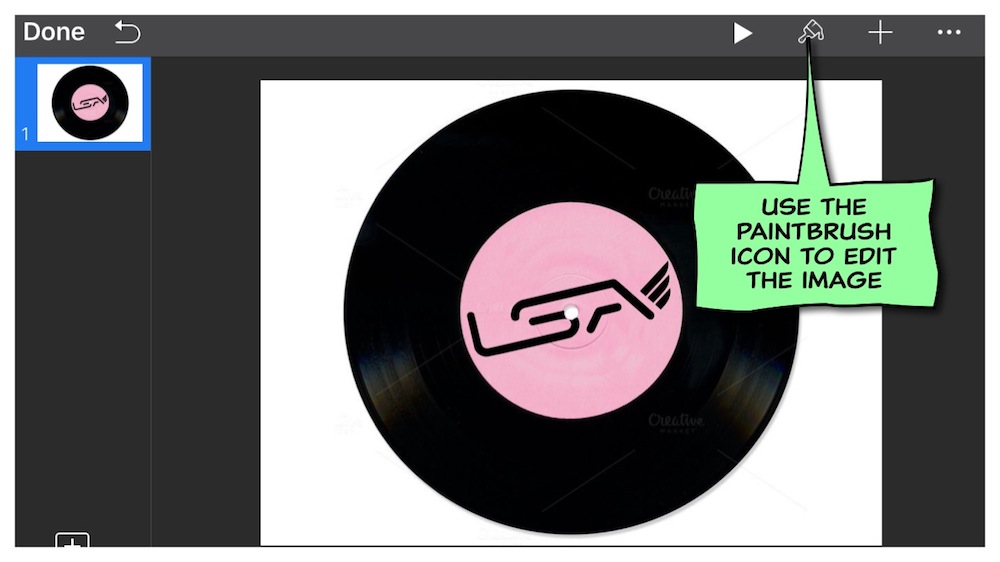
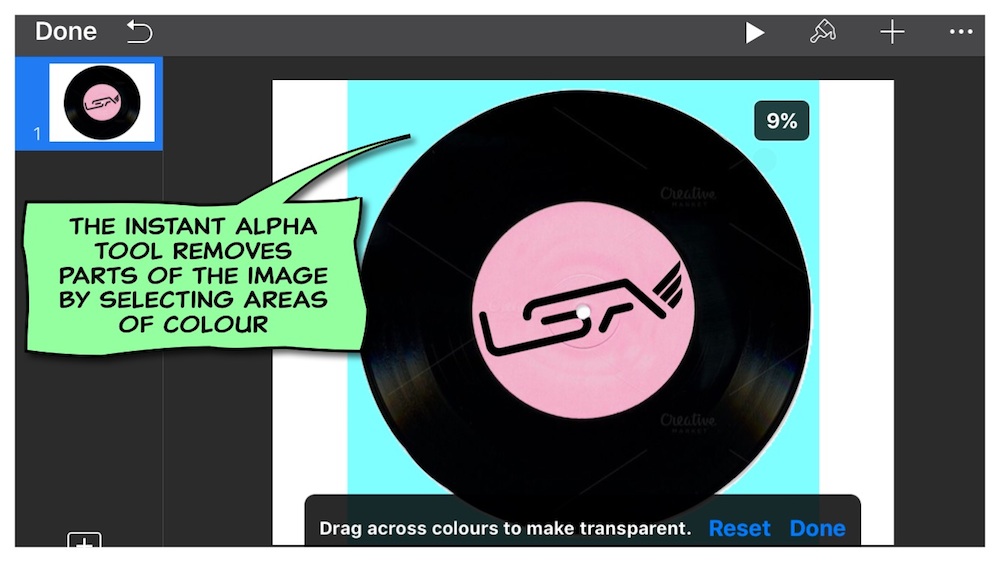
Once you have the image on the slide you can begin working on it. I have selected this image of a record with the LSA logo as my first image. You can rotate, adjust the size, add a border, reflection or shadow. You can also remove sections of the image using the alpha tool.

Tip: Preparing each of your images beforehand so they are easy to cut out using the alpha tool will save you time and make the whole process easier.
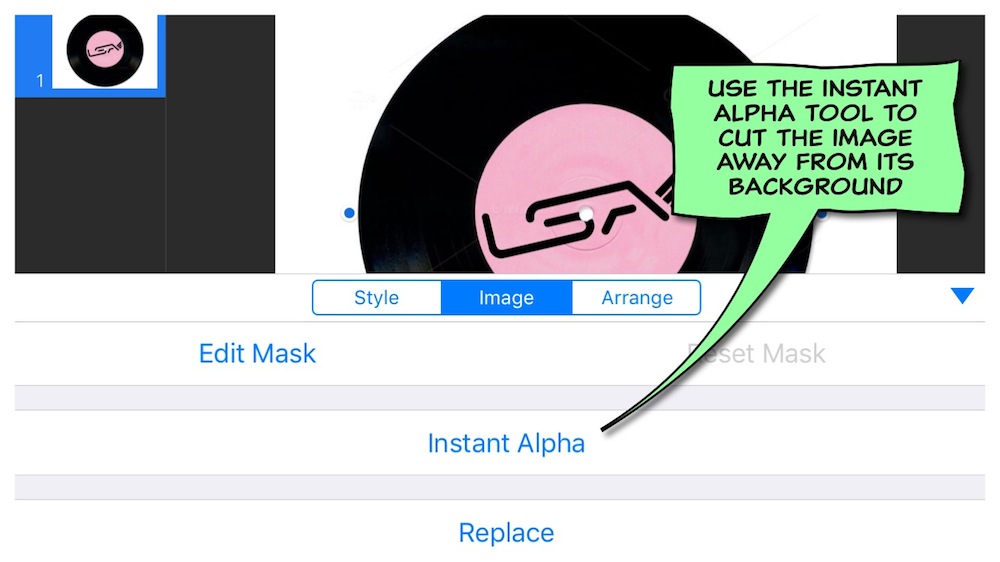
In this image I am removing the white background. The bolder the colour distinction between the areas you wish to cut the better the instant alpha tool will work.
Tip: Use the percentage to judge how strong the alpha tool is working,
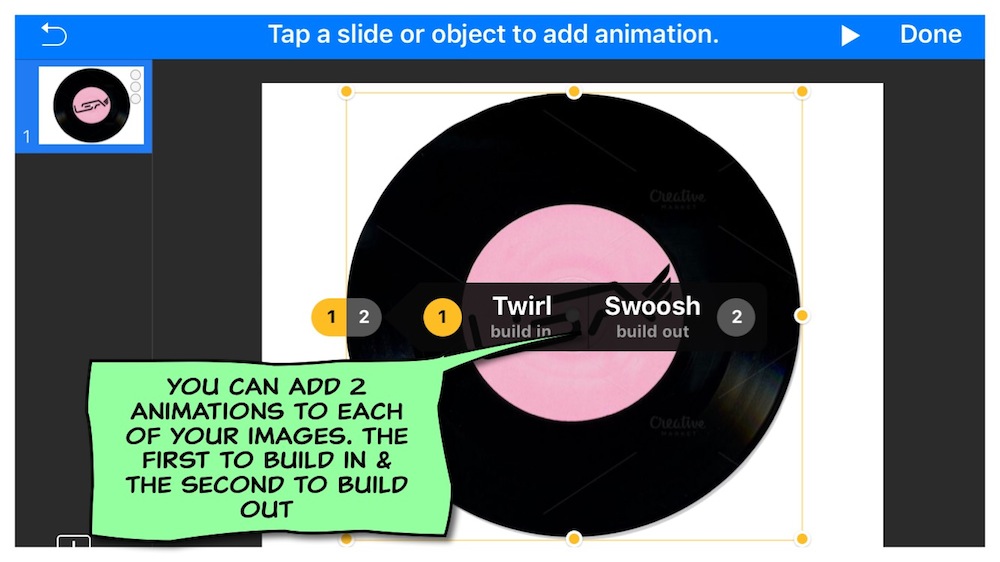
There are different animation effects available for building your image into view and out of view.
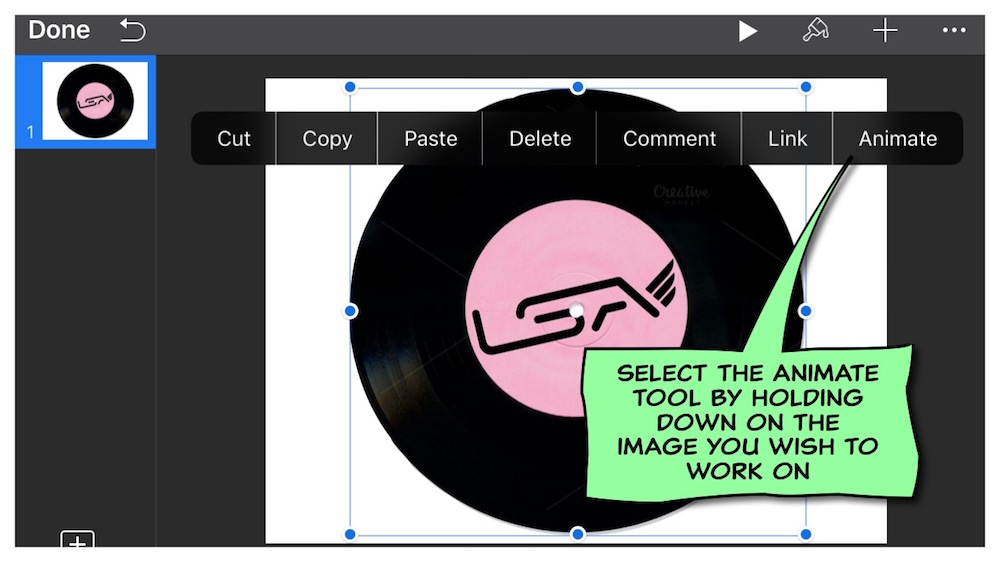
By selecting different animation effects for each of your images and selecting times and durations for them to appear and disappear can create clever effects. Experiment and have fun. You’ll be surprised at what you can do with a few simple well-timed effects.
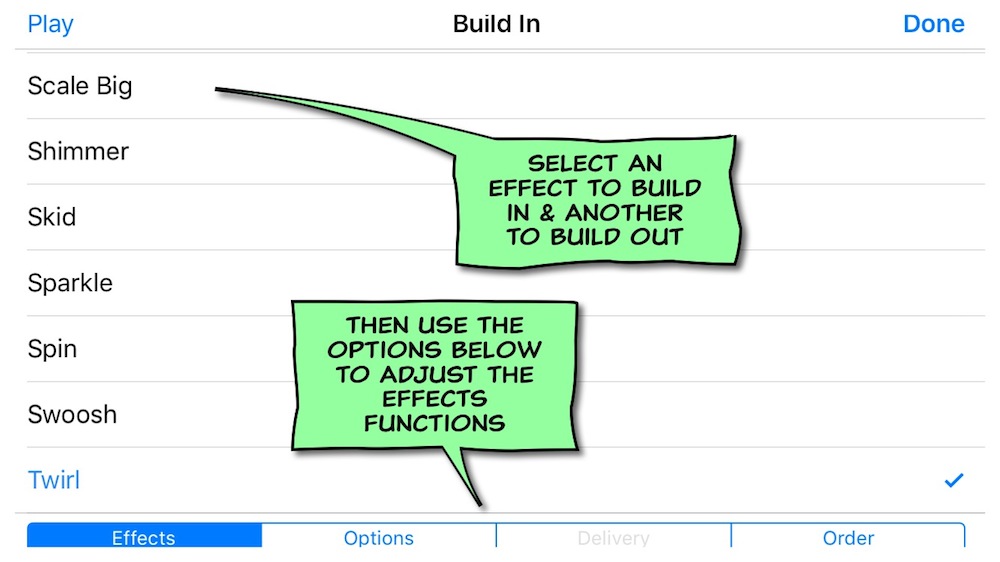
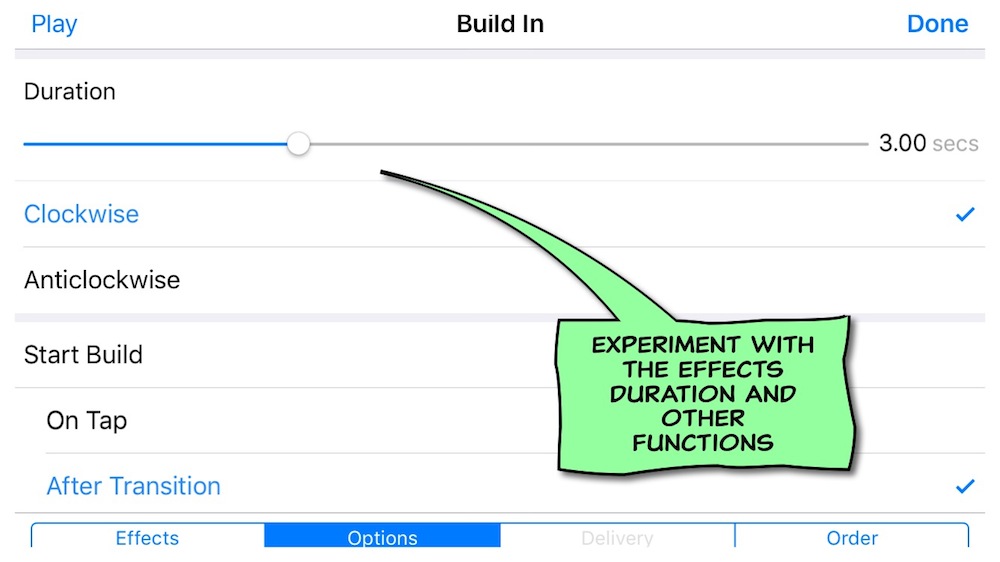
I have added a twirl effect to build the image of the record in and a swoosh effect to build out. I have adjusted the duration of the effects and selected the time in which they start.
I go on to do the same with a second image of a record, editing the image then adding effects that manipulate when and how the image appears and disappears.
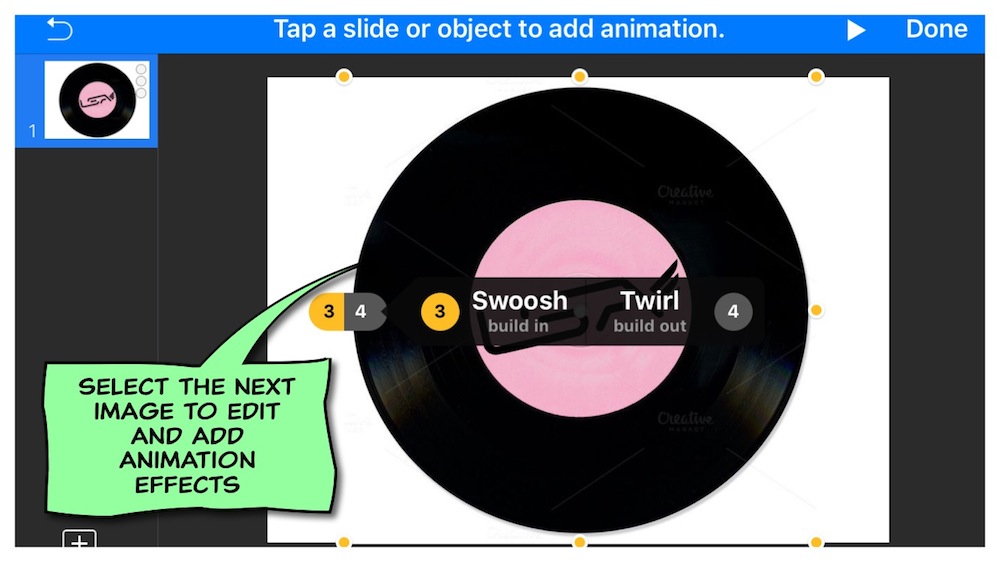
I then do the same with a third image. This time I use an image of the LSA logo and select a different animated effect to build out with.

Tip: As you layer on each image the slide will become more and more crowded. It’s important to remember to keep your GIF simple by imagining your GIF run in a three to five second loop. If your GIF is to complicated or too long it will take up to much memory and be difficult to post.
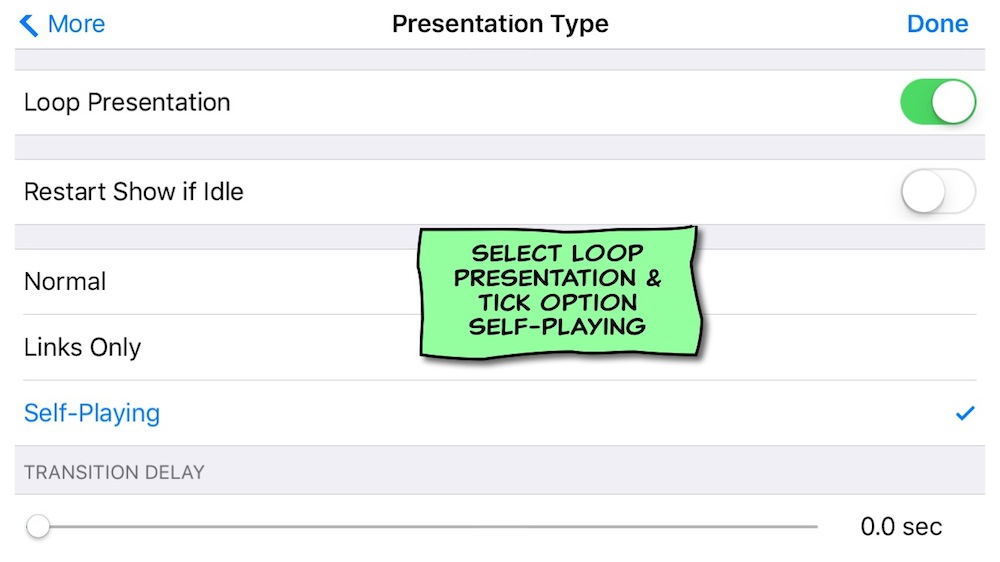
Remember to keep everything on one slide. Each image you add to the slide is like a layer of animation. You can move the layers around from top to bottom. Once you have added all your images, edited them, chosen the layer for them, added ‘build in’ and ‘build out’ effects on the images you wish to animate, you can then go into ‘Presentation Type’ to make sure that all the animations play in a loop. You can also adjust or remove things and delay time between the beginning and end of the slide. Remember to adjust the times of all the animations so the whole slide is under 10 seconds long. Ideally GIFs like to be 3 seconds long. I find that I need 6 seconds to make most my GIFs. The longer they are the harder they can be to share online.
Tip: As you build your GIF you should try and see how it will play. Always think about how long you want it to be. Don’t worry if its a little longer than you planed you can speed it up in iMove after you have converted it into a .mov .

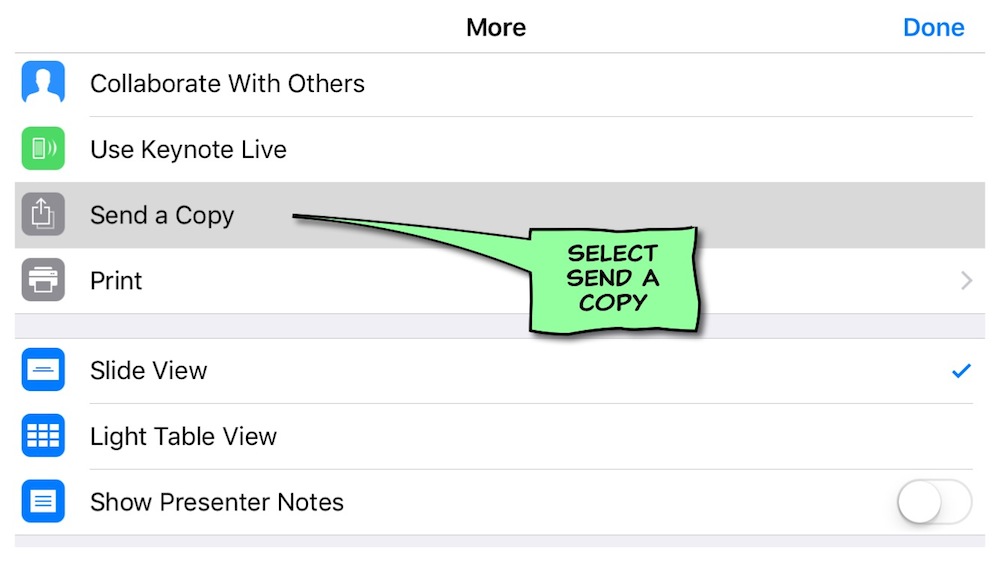
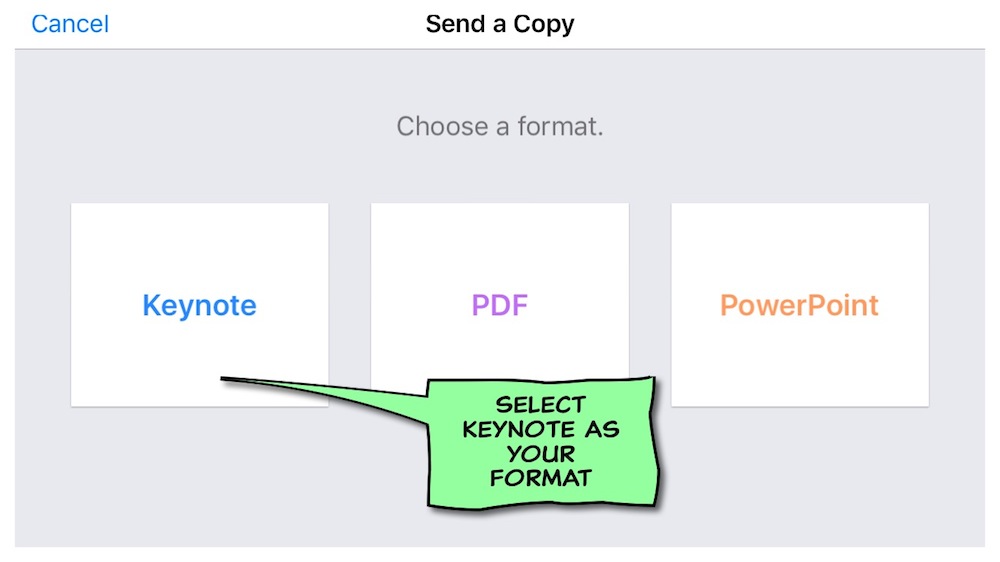
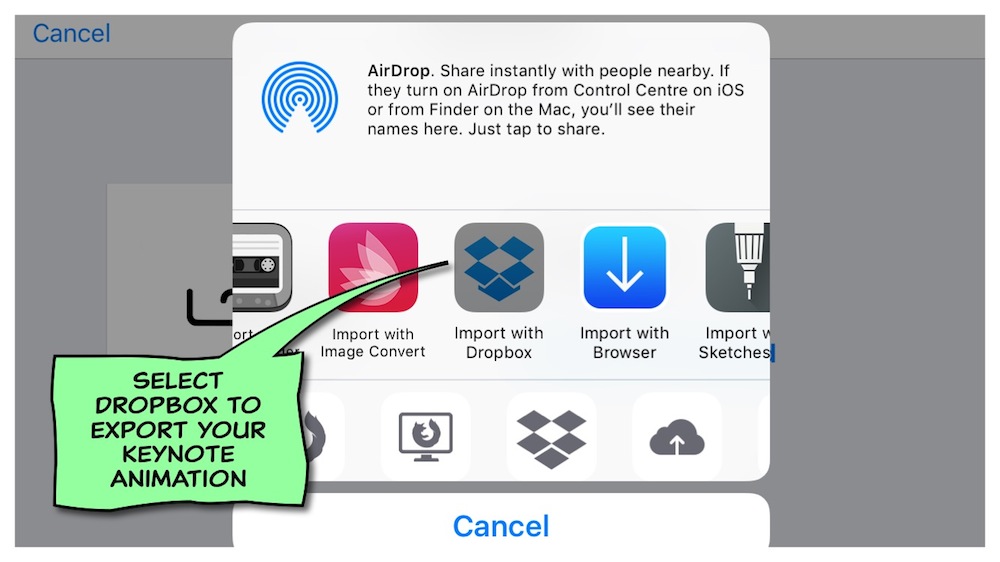
Tip: When you have everything working just how you want it you can save it into your Dropbox account. This is done by clicking on the ‘Send a Copy’ option.
Tip: Make sure you name and save your Keynote presentation in your Dropbox account.
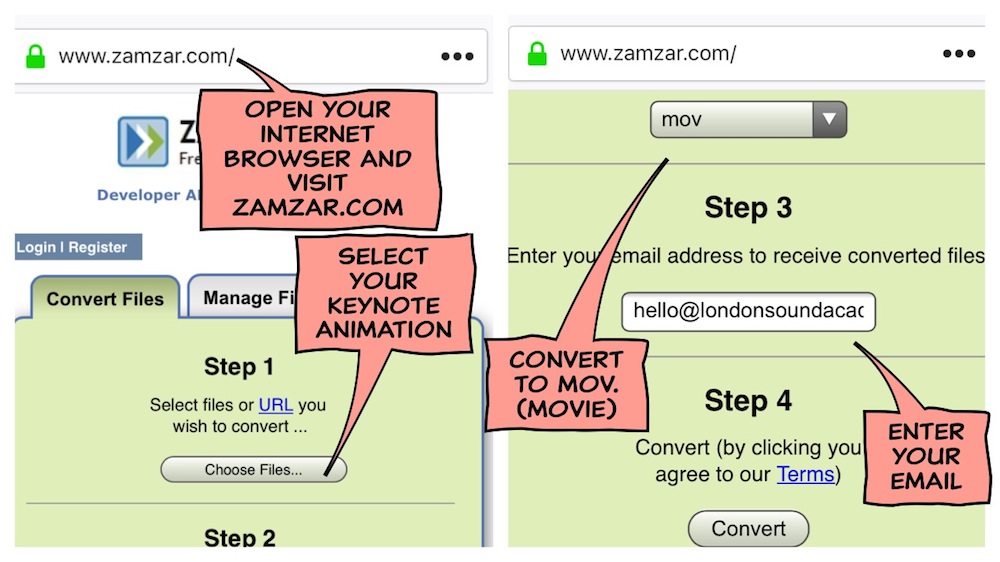
You now want to convert the keynote document in your Dropbox into a .mov . There are a variety of ways you can do this but I have found Zamzar.com to be the best free online file converter.
Open Zamzar.com in the browser on your iPhone/iPad and follow the four steps.
Step 1) click on the choose files button, then the dropbox icon to locate and attach your Keynote document.
Step 2) Select .mov in the convert files button.
Step 3) Enter your email address.
Step 4) Click the convert button.
Tip: Make sure you allow the file to fully upload before you do anything else with the iPhone/iPad.
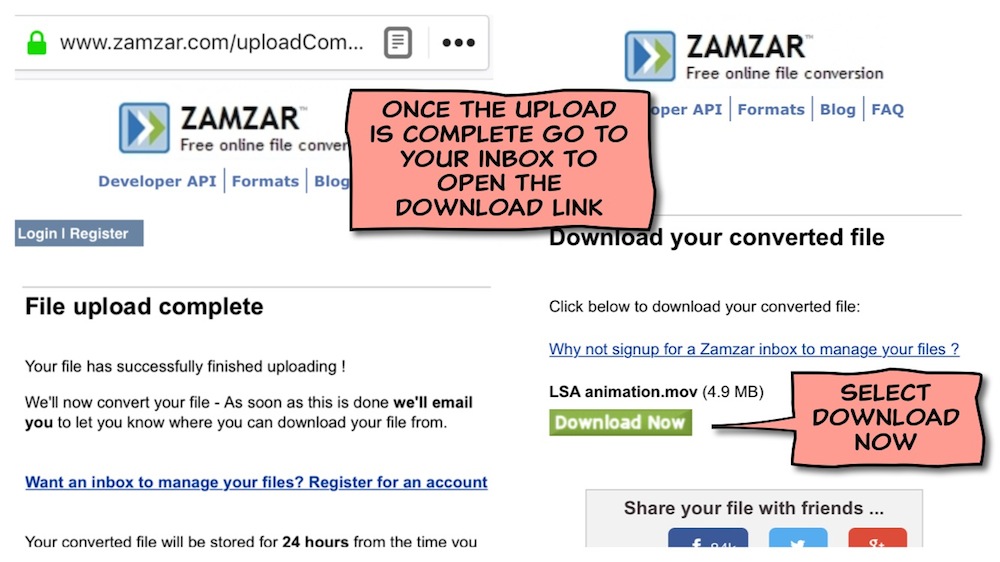
Tip: Sometimes you get emailed the link to download your converted document straight away but occasionally it can take a few minutes. Don’t leave it to long to open this link and download because it wont be available for long.
Tip: I have Safari set up as my main browser on my iPhone/iPad so when I click on a link from my email it will open in Safari automatically. Safari seems to work better than other browsers when downloading in Zamzar.com
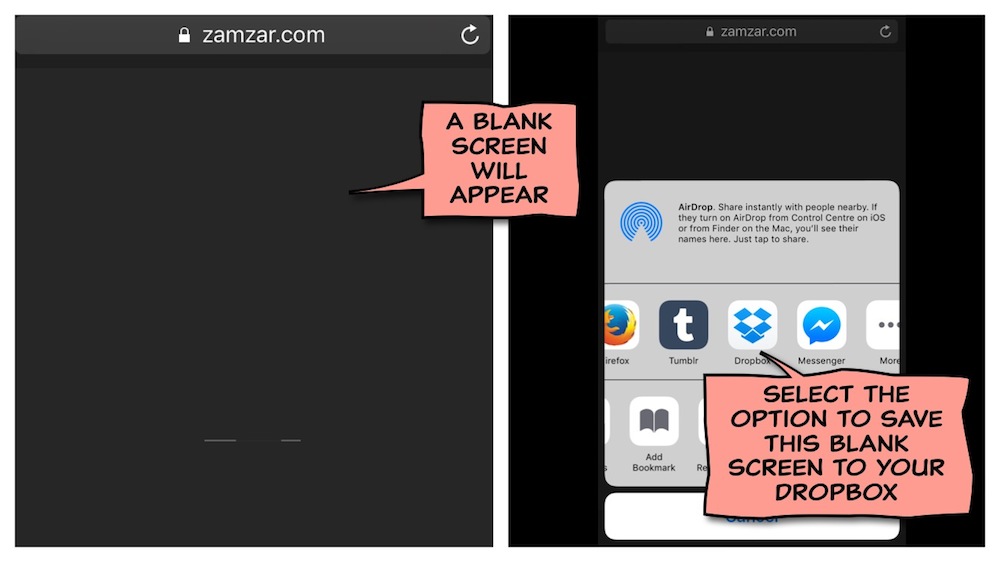
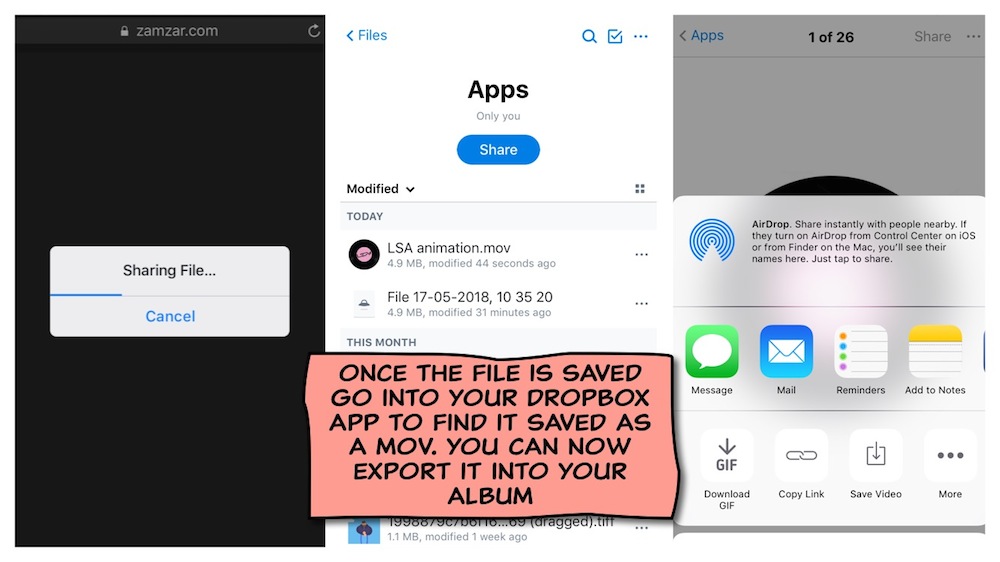
Once you have clicked ‘Download New’ button in the web page you have just opened you will see this empty looking web page open. It looks as though something hasn’t worked but this is all perfectly normal. All you have to do is click on the share icon in the top right corner, 3rd from the end. You can then click on the Save to Dropbox icon. Save your .mov where you can find it easily.
You can then open your Dropbox and export your movie to your photo album.
You now have a .mov version of the Keynote presentation you have made. You can open this .mov in iMove now and increase the speed.

Before turning your .mov into a GIF you can fine tune your animation by editing it in the iMovie app. You adjust the speed, make cuts and add filters or text. I have adjusted the speed so the animation is a more manageable 6 seconds long. I have also added a colourful filter. I then export it as a large iMovie. It is now saved in the photo album.
Using the Infltr app is optional. It’s really only necessary if you wish to crop or edit the frame ratio of the video. You can also use similar features like the ones found in iMovie

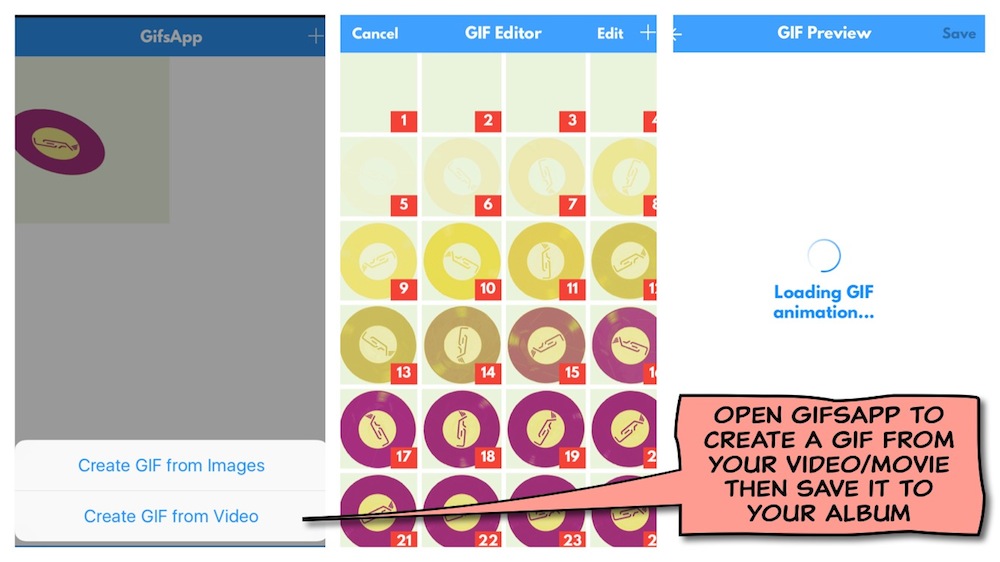
Open GifsApp and select create a GIF from video. Select ‘done’ to reveal the individual frames then select preview. Your animated video is now fully converted into a GIF and you can save it in your album.
It is possible to save a GIF in your photo album but it can only be viewed as a static image of the very first frame of your GIF. To view the GIF as an animation on your phone you will need the GIF Viewer app. It works very similar to your camera album.
There you have it. You can now go wild and make an eye catching GIF for every post you share on your blog.
If you want to create a GIF that combines video and animation the steps in this tutorial can help you achieve this by ignoring the Keynote and Zamzar.com stages and focusing on the iMovie, Infltr and GifsApps stages.
Don’t be afraid to experiment, try new things. Just make sure you keep it simple and think of clever ways you can loop it. Remember a well made GIF will attract ten times more visitors to your blog and be far more likely to be shared on your readers social media. You may even create something that goes viral.
Are you passionate about music? Discover a new musical talent by learning how to DJ or by learning the art of music production. Or if you already have some experience behind the decks, why not build refine your existing DJ skills. Are you looking for a unique gift experience for a music obsessed friend? Take a look at our range of intermediate and advanced DJ courses. We offer 1 to 1 tuition for all experience levels and music genres? Our students learn faster, gain more success and regularly secure gigs at Ministry of Sound, Egg and Electric Brixton and our Music Production students have been signed to Spinnin, Universal and Island Records! This is probably why London Sound Academy has been rated the best DJ and Music Production school in London since 2010.
